Choosing the right backpacking stove depends on your specific needs and preferences. You will need to consider factors such as weight, ease of use, fuel availability, and the type of meals you will be eating.
Here’s a breakdown of the different types of backpacking stoves, their features, and considerations to help you make the best choice.
- Cost. Consider the long-term cost of owning the stove by factoring in the per-use price. The stove itself may be cheap, but consider the operational costs, such as fuel and any unique components.
- Durability. Look at the construction materials, ease of disassembly for cleaning/repair, etc. Are there any flimsy plastic components that could break? The MSR whisper series receives accolades for its design & simmering ability, but many hikers complain that the plastic valves break. You don’t want to be inconvenienced by a broken stove while in the backcountry.
- Fuel. If you are planning to travel outside of North America, look for stoves that burn multiple fuels. Most stoves in North America use white gas, while kerosene is standard in other parts of the world, as is unleaded auto fuel.
- Boil Time. Decide whether you want a stove that produces a hot flame quickly (boils water fast) or one that offers simmer capability (gourmet cooking). There are even ones that will do both.
- Waste. Consider stoves that do not generate waste. Fuel canisters are not recyclable or refillable without specialized tools. You must carry out empty fuel canisters and properly dispose of them.
- Weight. Consider not just the weight of the stove, but also the weight of the fuel canister. Decide how much weight you are willing to carry. The advantage of stoves with fuel bottles or refillable tanks is that you can take as much fuel as you need. On shorter trips, you can get by without carrying only a fuel bottle. If we top off our refillable stove, the fuel lasts 3 days, burning 2-3 meals per day.
- Conditions. Consider the weather conditions you will be hiking in. Extreme conditions, such as high winds and severe cold, will impact the performance of backpacking stoves. Canister fuels can lose pressure in frigid temperatures, resulting in reduced gas flow and inefficient burning. Freezing temperatures, wind, and high moisture can also make it more difficult to ignite stoves that require a lighter flame.
Types of Backpacking Stoves

Alcohol Stove
Alcohol stoves are lightweight and often favored by minimalists and DIY enthusiasts because they’re easy to build from common household materials. This stove uses denatured alcohol to burn and can take anywhere from 5 to 15 minutes to boil water.
Various build designs are all over the web. A great resource is https://zenstoves.net/Stoves.htm. Make sure your design includes a wind shield. Outdoor Herbivore made a stove using an aluminum soda can and a stainless steel soup can. Both types worked, but each one took 3+ minutes for the water to boil. For the fuel, we used Heet, a brand of methyl alcohol available at U.S. gas stations and auto parts stores. One important consideration of the alcohol stove is that it can be difficult to see the flame during the day, as it burns nearly clear. We accidentally scorched our hand while waving it back and forth over the invisible flame, convinced that it wasn’t lit. Additionally, since there is no way to control the flame with an alcohol stove, it either burns at full intensity or not at all.
Alcohol Backpacking Stove Advantages:
- Weight: Extremely lightweight, ideal for ultra-light backpackers.
- Simplicity: Easy to use and build, with many designs found online.
- Cost: Minimal initial investment since you can assemble one at home using supplies you already have. If you don’t like the result, you can recycle the can.
Alcohol Backpacking Stove Disadvantages:
- Boil Time: Takes longer to boil water (typically 5-15 minutes), which can make you impatient in colder temperatures when you want a hot beverage or soup quickly.
- Flame Visibility: The flame is hard to see during the day, posing safety concerns.
- Lack of Control: No simmer capability; it’s either on or off.
Best for: Lightweight backpackers looking for minimalism and simplicity rather than speed or multi-functionality.
Canister Stove
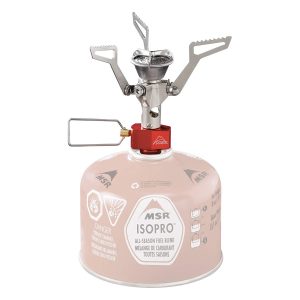
These are simple to use and provide an instant flame. The flame burns clean, so it is unlikely to leave black soot on your cooking pot. Many canister stoves also come with flame control or simmer capability.
The Canister Stove is an excellent option if you don’t mind the inconvenience of purchasing and disposing of canisters.
The biggest drawback is that it does not perform well at freezing. The fuel depressurizes when exposed to temperatures at or below freezing, which could leave you without a flame or with a very weak one. It is also not easy to check how much fuel is left in the canister. The canisters are hard to find (available only at outdoor stores), and shipping is cost-prohibitive due to the hazardous materials (hazmat) shipping protocols for pressurized isobutane fuel canisters. Despite these drawbacks, we’ve been happy with the performance of our MSR Pocket Rocket.
Canister Backpacking Stove Advantages:
- Instant Flame: No pumping required to pressurize the gas, and some ignite with the push of a button, making meal preparation quick and straightforward.
- Simmer Control: Many models provide excellent flame control, making them suitable for simmering or gourmet cooking.
- Compactness: Generally designed to be lightweight and easy to pack.
Canister Backpacking Stove Disadvantages:
- Cold Weather Performance: Not ideal for freezing temperatures, as fuel can depressurize.
- Fuel Availability: Fuel canisters are often only available at outdoor stores and can be costly to ship due to hazmat regulations.
- Environmental Waste: Disposing of canisters can be an inconvenience, as they are typically not recyclable.
Best for: Backpackers who prioritize convenience and speed and are not traveling in extreme cold.
Integrated Stove

Integrated backpacking stoves, like the Jetboil, are compact, all-in-one canister stoves that feature a base that snaps onto the bottom of a fuel canister, securely holding the pot and lid. This system is mainly intended for quickly boiling a limited amount of water, 3 to 4 cups at a time. Its closed design incorporates proprietary components.
If you’re a solo hiker looking for a simple cooking setup, this stove is ideal. However, if you enjoy preparing gourmet meals or cooking for a group, this stove may not meet your needs.
Integrated Backpacking Stove Advantages:
- Speed: Boils water faster than most other stoves due to its efficient design.
- Simplicity: Very user-friendly, especially for solo hikers who just want to boil water.
- Compact Design: All components pack neatly together, making it great for limited space.
Integrated Backpacking Stove Disadvantages:
- Limited Functionality: Not suitable for cooking elaborate meals or for groups, as it’s best suited for boiling water.
- DIY Limitations: For those who like tinkering or modifying their gear, the proprietary design may be unsatisfying.
Multi-Use Stove
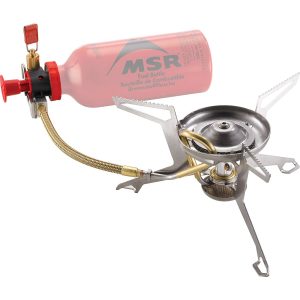
Multi-fuel stoves are versatile, allowing backpackers to use different fuel sources, such as white gas, kerosene, or unleaded gasoline. They are handy for international travel.
These stoves can be heavy for some, but they do perform and last. For instance, we have a 30-year-old Coleman Peak stove that still works, and even though the model is long discontinued, we can still purchase replacement parts for it. The design is intuitive and simple – we can take it apart in a few seconds to clean/replace a part when needed.
Multi-Use Stoves boil water quickly (2-3 mins), simmer, and can accept different fuels. This is a great stove to take if you plan to travel internationally since it can accept various types of fuel, including kerosene, white gas, unleaded vehicle gas, and diesel.
The primary disadvantage is that it requires priming to start and is heavy.
Multi-Use Backpacking Stove Advantages:
- Versatility: Can be used with various fuels, which is essential in regions where canister fuels may not be available.
- Performance: Generally performs well across a range of temperatures and conditions.
- Durability: Often built with sturdy materials, designed for rigorous use in the backcountry.
Multi-Use Backpacking Stove Disadvantages:
- Weight: Typically heavier than canister or alcohol stoves due to additional parts and fuel management systems.
- Complexity: More components mean more parts that can potentially fail or require maintenance.
Best for: Backpackers planning long trips in areas with limited fuel availability, international travel, or those venturing into diverse climates.
Backpacking Stove Comparison Table
pros (+) and cons (-)

Summary
Choosing the right backpacking stove will make meals more enjoyable. Whether you favor the lightweight of an alcohol stove, the speed of a canister system, or the flexibility of a multi-fuel stove, each option has its advantages and trade-offs. Hopefully, these considerations help you narrow down the right backpacking stove for your needs.
Happy cooking!
5 thoughts on “How to Choose the Right Backpacking Stove: A Comparison”
These tips on what to compare to get the best backpacking stove on the market are spot on!
Not quite sure why it was stated propane canisters are not recyclable! When in fact they certainly are.
Isobutane fuel canisters can be recycled in places that accept mixed metal. Make sure the canister is empty and punctured. Contact your city/local recycling center to see if it is accepted.
How about the twig stoves ????
Wood stoves are great in wooded areas. You’ll need patience waiting for the water to boil. We will cover that in our next version of the article. Thanks for the suggestion.