Knowing how to read a topographic map is an essential skill for navigating the backcountry. Make sure you understand how to follow a topographic map before your hike — especially if you plan to be in a remote area.
Here we’ll cover the basics and provide some online sources for finding topographic hiking maps. We will also feature some external sites that teach map skills & orienteering in greater detail.

What is a Topographic Map
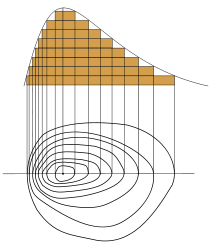
Topographic maps render the three-dimensional ups and downs of the terrain on a two-dimensional map. The topographic map shows a cross-sectional view of the terrain, known as a topographic profile.
If you sliced through and pulled back a portion of the earth, and viewed it from the side, the surface would be a topographic profile. In this example, the concentric circle shows the profile of a hill.
Topographic maps describe the shape of the land and portray both natural and significant manmade features. These include mountains, valleys, waterways, dams, roads, boundaries, and bridges.
Due to their level of detail, the topographic map remains an indispensable tool for measuring and navigating the terrain.
Elements of a Topographic Map

A topographic map uses three major factors to help you visualize and navigate the terrain:
- Contour Lines
- Contour Intervals
- Symbols & Colors
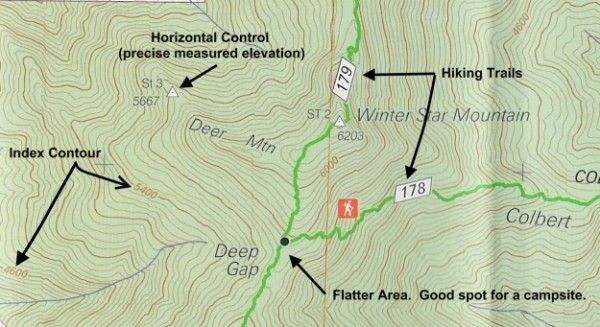
Once you understand how to decipher and combine these elements, not only will you become more skilled in navigating the trail, but you’ll have a more accurate view of the surrounding territory. For instance, if your knees start aching, and the map shows the elevation rises on the trail ahead, you can look at the topographic map for an alternative trail with less of a climb. And if you are looking for a good spot to pitch a tent, you can look at the map for a flatter area.
Contour Lines
Brown contour lines represent the shape and elevation, or contours of the land. The contour lines connect points of equal heights, so elevation remains constant if you physically follow a contour line. And, if you cross these contour lines, you will either be climbing or descending.
- Contour lines are printed in light brown and represent the shape of the land.
- Every 5th line is an index contour printed in dark brown. They contain the elevation.
Contour Intervals
The equal spacing between the contour lines is the contour interval. Depending on the terrain, this interval may depict a small vertical rise or a large vertical rise. For instance, in a mountainous area, a 100-foot contour interval will indicate a 100-foot elevation rise for each line. The contour interval is defined in the margin area of the map.
To determine elevation, pay attention to the amount of space in between the contour lines. The lines get closer together when there is a steep slope, representing an ascent or descent. The only way to tell if the slope is going up or down is to look at the elevation numbers printed on the index contour lines. If the numbers are increasing, the slope goes up which means you will be climbing; if decreasing, the slope goes down, and you will be descending.
- Lines close together indicate a steep grade. Expect to climb or drop!
- Lines that are very close together or joining represent a cliff.
- Lines widely spaced apart (or not shown at all) indicate a flatter terrain.
Symbols & Colors
Features of the land, either man-made or natural, are represented by colored symbols. See the margin of the map for a definition of the symbols. Most topographic maps use standard colors to represent the following features:
Black: man-made features such as trails, railroads, wilderness boundaries, and roads
Blue: Waterways such as a river, lake, stream, or swamp
Green: Vegetation or cleared vegetation, such as forests, vineyards, and orchards
Brown: Contour lines, contour elevations
Red: Main roads, urban development, and unique features
See a complete list of topographic symbols
Scale
Scale refers to the relationship between distance on a map and the corresponding distance on the ground. The scale represents this ratio in a fraction format. For instance, a 1:24,000 scale means 1 unit of measure on the map equals 24,000 of the same units of measure on the ground. Therefore, a 1:24,000 scale means that one inch on the map equals 24,000 inches (2,000 feet or 609.6 meters).
- The map scale is defined on the margin of the map
There are many different map scales produced. The United States Geological Survey (USGS) provides the most widely distributed topographic maps in the U.S. These are the 7.5-minute 1:24,000 scale, where 1 inch represents 2,000 feet. A scale of 1:25,000 is the standard for countries that use metric units, where 1 centimeter = 0.25 kilometers. Other common scales include the 1:100,000 and the 1:250,000 scale.
- Why is the 1:24,000 scale referred to as 7.5 minutes? These maps cover a 4-sided area divided into quadrangles bounded by two lines of longitude high and two lines of latitude wide. A 7.5-minute map shows an area that spans 7.5 minutes of latitude and 7.5 minutes of longitude, where 60 minutes equals one degree of angle.
How to choose the right scale for a hiking map
Medium-scale maps (e.g., 1:24,000) cover smaller areas in greater detail, whereas smaller-scale maps (e.g., 1:250,000) cover larger areas in less detail. The most important consideration in choosing a map is picking the correct scale. Ensure the scale will provide the level of detail required for its intended use. A few examples:
- 1:250,000 scale: 1 inch ~ 4 miles (less detailed; adequate for driving to the trailhead)
- 1:100,000 scale: 1 inch ~ 1.6 miles (detailed; sufficient for planning a hike)
- 1:24,000 scale: 1 inch ~ 2,000 feet (more detailed; adequate for hiking the trail)
Where to Get Non-Digital Paper Hiking Maps
Look for maps printed on durable poly art material, which is tear-resistant and waterproof.
- USFS – hiking trails produced by the US Forest Service (USFS). We have been extremely impressed with the accuracy of these maps when hiking throughout the forests in the state of North Carolina. Find USFS maps.
- Trails Illustrated – hiking trails produced by National Geographic Maps cover many of the US national parks and forest areas. We find the forest maps created by the US Forest Service (USFS) to be more accurate for hiking in the National Forest lands. In cases where USFS maps do not exist or are outdated, Trails Illustrated is a suitable alternative. Find Trails Illustrated maps.
- Earthwalk Press – hiking trails produced by rangers from the National Park system. The maps contain useful information about trails and camping areas in the US National Parks. These include the Wind River Range, Grand Canyon, Mount Rainier, Grand Teton, Yellowstone, and Northern California. Earthwalk Press often covers areas for which no other hiking map exists.
- Tom Harrison Maps – topographic maps for hiking areas in the state of California. Find Tom Harrison Maps.
- Mytopo where you can order stock maps or create custom maps using the desired size and scale.
Sources for Planning & Navigating Trails
- US Geological Survey 1:24,000 – offers a few topographic maps for hiking which provide excellent detail, but often only cover small areas of the forest. The less detailed USGS maps are better for planning hikes. Many maps shift North around so the map fits on the page, which can cause confusion while hiking. USGS topographic maps do not shift North. North is always at the top of the map. Maps are available for you to print out for free. Find USGS maps.
- DeLorme Road Atlas & Gazetteers by State – These topographic atlases offer excellent accuracy for driving to trailheads, and we have discovered numerous scenic routes and old logging roads from studying these maps. The maps provide other useful information such as recreational areas, trails, attractions, car camping, historic sites, fishing sites, boat launches, scenic drives, etc.
- Topo! Software from National Geographic for printing your maps at home. We have never tried the software, but it sounds nice.
- Guthook Guides is a popular app for those that prefer downloading maps to a phone.