
You are excited about your upcoming backpacking trip but not the food preparation. You want to plan for the hike instead of preparing backpacking food, which, when done yourself, can take months.
Making your backpacking food calls for considerable preparation. You must decide on a menu, purchase ingredients, prepare the meals, dry them using a dehydrator or freeze-dryer, measure and ration the portions, seal them into storage bags, and label the cooking instructions. Then, there is the concern about having packed enough food or too much. How will it taste – pleasant, dreadful, bland, salty…? Will you have enough calories, protein, fat, or carbs? Food planning can become a complex and time-consuming part of trip preparation.
What can you do about it? Here are a few options and tips to help you prepare or purchase your backpacking food.
1. DIY: Assemble Meals Using Pre-Dried Ingredients
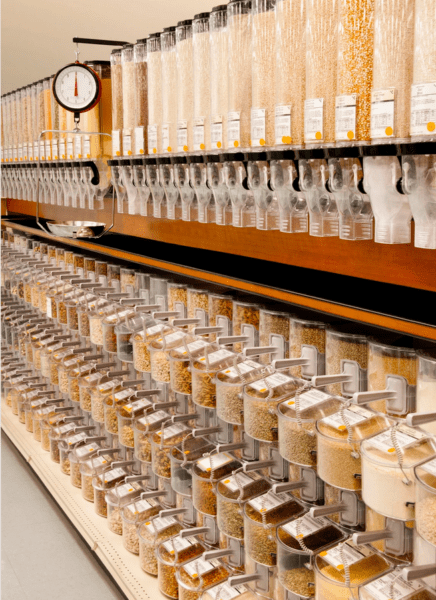
If you have the time, inclination, and know-how to pair ingredients to prepare a good meal at home, you can make your backpacking meals using pre-dried ingredients. Dry foods are light and take up minimal space in your pack. We recommend purchasing dried ingredients in bulk at local co-ops, health food stores, and grocery stores for higher quality ingredients and to save money. Berkeley Bowl and Rainbow Grocery in the California Bay area are excellent places to grab dry food and mixes in bulk. You can also purchase dry backpacking food ingredients and mixes directly from online suppliers such as Outdoor Herbivore.
Grocery Store Staples to Look for –
- Instant Rice. Instant rice is fully cooked and dehydrated, allowing you to fully rehydrate it in hot water (190 – 212 F) after 10 minutes. Instant Brown Rice contains the most nutrients per ounce. We don’t recommend parboiled rice as it needs to be boiled or simmered continuously for up to 20 minutes to soften the grains, using up precious stove fuel.
- Dry Pastas. Regular dry pasta found on grocery shelves will cook up fast, but pay attention to the thickness of the pasta. Thinner-walled pasta will reconstitute quicker in hot water than thicker/dense pasta. Instant pasta will soften the fastest but is harder to find. Fried ramen noodles are popular with backpackers because they are cheap and abundant but are a poor source of nutrients. Use unfried noodles instead. Pasta made with whole grains has a higher nutrient profile and calorie density than enriched wheat pasta. See our tips about choices of pasta versus noodles for backpacking.
- Couscous (Instant Semolina) is pasta made from crushed durum wheat. Most packaged couscous in the U.S. is the North African variety, which looks like yellow cornmeal and has been pre-steamed and dried to allow quick preparation. When covered with hot water, the couscous swells and fluffs up after 5 minutes.
- Instant Quinoa. Regular quinoa is fast-cooking with its 15-minute cooking time, but this is too long for hikers who need to preserve fuel. Instant quinoa will rehydrate within 10 minutes by soaking it in hot water, which is better for backpacking. Instant quinoa is a specialty product and is unavailable in most stores. Outdoor Herbivore is the only source for Dehydrated Instant Organic Quinoa. Our quinoa is fully cooked and dried. The result? A seed that hydrates in 5-10 minutes when covered with boiled water. Another option is puffed, crisped, or baked quinoa, a ready-to-eat version for cold cereals, salads, and snacking. Lastly, flaked quinoa rehydrates fast in hot water but has a mushy, paste-like texture, making it suitable for hot cereals.
- Oats (regular rolled). Most people don’t realize that rolled oats are pre-steamed and dried and, therefore, do not require cooking. You can eat them raw as cold cereal or heat them as porridge. Add rolled oats to thicken and supplement calories in lighter meals such as soups. We do not recommend purchasing “instant” oats because they often contain unhealthy additives.
- Corn Grits (quick cook or instant). Grits have a mild flavor and complement nicely with sweet and savory toppings. For breakfast, try adding cinnamon, sugar, and nuts. As an entree, make a savory polenta-type meal by adding dried cheese, Italian spices, garlic, and sun-dried tomato. Crank up the calories and flavor further with an olive oil packet.
- Dried Vegetables and Seasoning Packets. If you like flavor and texture, add dried vegetables and seasoning to your liking. A few dehydrated vegetables, such as onion flakes, potato flakes, and dried tomatoes, are easy to find in grocery stores. Other dried ingredients, such as bell peppers, broccoli, celery, carrots, kale, green beans, squash, and freeze-dried mixed vegetables, can be found in specialty online shops. Spice mix packets are convenient for adding robust flavor without purchasing individual seasonings. Outdoor Herbivore uses a multitude of herbs in each dish to add flavor, aroma, and spices with healing properties. You will be amazed how seasoning (versus the boring salt & pepper) transforms a meal!
- Instant Soup Mixes. Soup mixes don’t have to be limited to soups. They work great as a gravy mix for noodles, rice, and potatoes.
- Dried Fruits and Nuts. Fruit, seeds, and nuts are easy ways to add more calories, nutrients, and flavor to your backpacking meals. Look for unsulphured dry fruit (preferably organic) and mixed nuts. They work in everything from rice to pasta and cereals.
Why Unsulphated? Sulfuring is a preservative and bleaching agent. It is used on fruit to retain its color and to preserve vitamins A and C. In the process, it destroys thiamine, an essential B vitamin, and causes health effects in many people. The long-term safety is questionable at best. Outdoor Herbivore does not sulfur any fruits or purchase any sulfated dried fruit. If you buy organic, it can NOT contain sulfites.
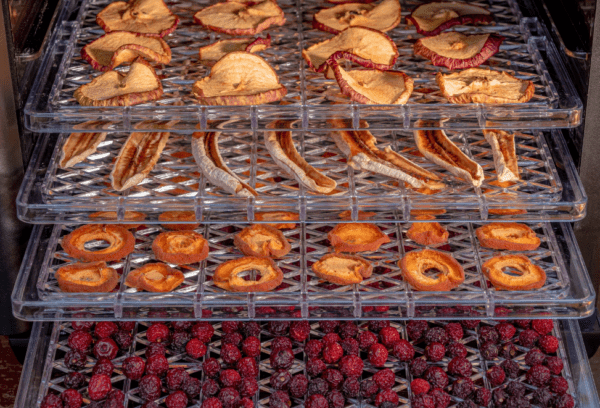
2. DIY: Make & Dry Your Food
Purchase raw food ingredients and dry the foods yourself. Use the dried ingredients to flavor the staple food items above. Drying requires a dehydrator, oven, air fryer, freeze-dryer, or sun.
- Dehydrator – Drying your own food requires the use of a food dehydrator, a device composed of stackable vented trays, a fan, and a heating element. If you don’t own a dehydrator, you can use your oven at the lowest heat setting; however, the drying time will take considerable time, making it costly. Dehydrating does require some practice and is time-consuming, but it is not difficult. When buying a dehydrator, look for those with a fan placement in the back of the unit (versus the top or bottom) to allow for consistent drying.
- Sun—Drying outside takes patience and luck. You’ll have to constantly watch the weather to ensure no rain and protect the food from insects. If you live in a hot and dry climate, drying in the sun will be easier. We can attest that humid climates do not work, as the food develops water beads and becomes sticky. The presence of water on food will cause it to spoil/mold very quickly.
3. Purchase Freeze-Dried/Dehydrated Backpacking Meals
Commercial backpacking meals are great for convenience, but watch out! Many are highly processed, nutrient-poor, and loaded with sodium or sugars. Look for backpacking meals containing quality ingredients, a variety of seasonings (not just salt!), and enough calories to fill you up. Look closely at the serving size or portions (see Outdoor Herbivore’s tips on comparing backpacking foods). Also, notice the packaging weight. Many of these meals are packaged in one-size-fits-all bulky bags with excess space for adding water. Health-conscious hikers may want to weigh the health risks of eating food heated in plastic.
Freeze-Dried versus Dehydrated
Freeze drying and dehydration are two ways to preserve food by removing water. Since bacteria and mold can only grow in moisture, drying is a great way to preserve food. Both methods provide a long storage life and perform well for camping. The main differences are Cost, Texture, and Space.
- Cost. Dehydrated food gives you the biggest bang for your buck. It costs less than freeze-dried food because freeze-drying requires specialized industrial-grade equipment.
- Texture. Dehydrated and freeze-dried ingredients have different textures. Dehydrated ingredients usually have a dense, pliable texture, while freeze-dried ingredients tend to be airy and crispy.
- Space. Dehydrated is more densely compacted. Freeze-dried is lighter in weight but takes up more space.
- Vitamin Loss. Freeze-dried food has the least amount of vitamin loss when drying due to lower heat and an enclosed system.
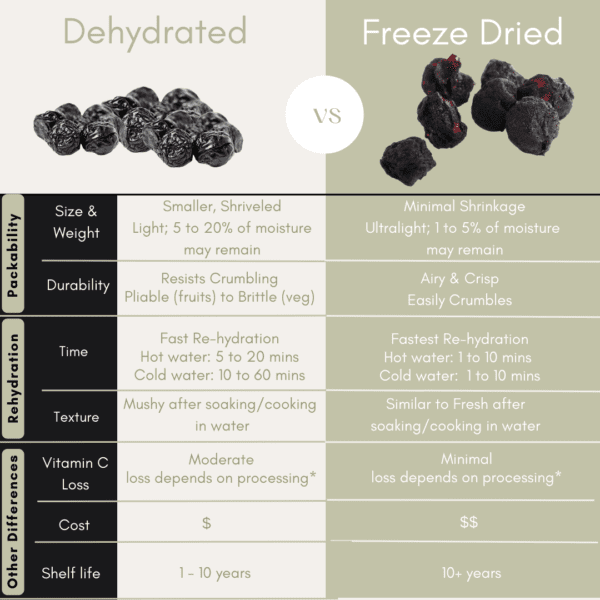 Beyond that, it is a matter of preference.
Save yourself from kitchen duty and have Outdoor Herbivore provide you with the meals you need! See our Backpacking Meals and Bulk Dry Instant Ingredients. There many other choices to consider as well.
What foods will you take on your next outdoor trip?
Related Posts:
2 thoughts on “How to Choose the Right Food for Your Backpacking Trip”
Great website and great blog. It hits home for people like me, a vegetarian and backpacker. Someone on Whiteblaze.com linked to your site and it’s good to see that I will have another source of awesome backpacking foods. And it’s also neat that you are located in North Carolina as I’ve done most of my backpacking around Boone and east Tennessee.
Tipi Walter
Thank you, Tipi! It is great to hear from other vegetarian backpackers!